User Guides
FireSwitch® Self-Configuration Information
Welcome to this dedicated FireSwitch® User Guide and Self-Configuration Portal!
The contents of this mini-site are intended to enable customers to self-administer some basic and commonly requested changes. This enables customers to quickly and easily make some of their own changes at at time convenient to them, for zero cost!
Common Self-Configuration Guidance
Logging-In to the FireSwitch Portal
1. Go to your FireSwitch® Portal webpage. If you are not sure of the web address give us a call at ®Support Support on 020 7501 3030 (Mon-Fri 08:00-17:00).
2. Log in with your extension username and password. This will have been issued to you during your system setup. If you've forgotten this then give us a call at Support Support on 020 7501 3030 (Mon-Fri 08:00-17:00).
IMPORTANT: never share your username/passwords with anyone. Spitfire will never ask you for this information.
Extension Name Changes (by Cust Admin)
1. Log in to your FireSwitch Portal homepage.
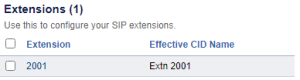
2. Navigate to ‘Configuration’ tab and select the ‘Extensions’ option.
3. Select the extension you would like to edit.
4. Make the following changes:
Effective Caller ID Name - this is the name of the user that will be displayed on internal calls to other users.
Directory Full Name - this is the name that will be displayed in the internal directory accessible by other users.
5. Press Save.
6. For the configuration to take effect you will need to either power-cycle the handset or, alternatively, force a reboot remotely within the FireSwitch Portal via the menu - to do this navigate to Status > Registrations > select the device with the extension details listed, and then choose either "Provision" or "Reboot". This may take a short while to take effect.
Setting up a Divert from an Auto Attendant (by User or Cust Admin)
A divert/forward cannot ordinarily be achieved from an Auto Attendant. However, with the use of a so-called Divert Extension, a workable solution can indeed be put in place.
A Divert Extension is one that is not intended to be assigned to a physical or softphone; it is solely for the purposes of setting up diverts on the FireSwitch Portal.
If you already have a so-called Divert Extension then all you need to do is point the Auto Attendant at it, and then set up a divert on the Divert Extension itself, by following the Divert from an Extension instructions.
If you do not have a so-called Divert Extension, you can request one via Spitfire Support. Please be reminded that this is not for assignment to a physical or softphone.
Setting up Voicemail to Email (by User)
This feature lets the PBX send a voicemail received on an extension to an email address as an attachment or a link. To set this up, hover over ‘Configuration’ and select ‘Extensions’.
1. Select the extension you which to edit. e.g. 2001
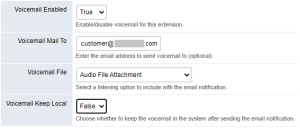
2. Set ‘Voicemail Enabled’ to ‘True’.
3. Add the recipient email address in the ‘Voicemail Mail To’
4. Select a listing option to include in the email for the ‘Voicemail File’ drop down field:
(a) Audio file attachment: this will send the audio file attached to the email.
(b) Download link (no log in required): this will send a link to access the voicemail.
(c) Listen Link (log in required): this will require log in details before accessing the audio file.
5. From the ‘Voicemail Keep Local’ drop-down, select if you would like to keep the Voicemail on the system after the email is sent (True) or if you would like for it to be removed (False).
6. Save.
Adding and Removing Extensions from a Ring Group (by Cust Admin)
Watch this space 🙂
 |
More Tips Coming Soon!
Watch this space 🙂
|
Setting a Divert from an Extension (by User)
1. Log in to your FireSwitch Portal homepage.
2. Navigate to ‘Apps' > 'Call Forwards' menu.
3. Select your Extension.
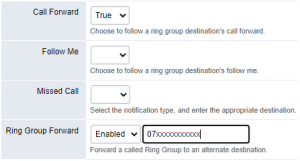
4. Decide which kind of Call Forward is required:
Call Forward: forward all inbound calls to the number specified.
On Busy: forward inbound calls only if the extension is busy on another call.
No Answer: forward inbound calls if the user does not pick up the phone.
Not registered: forward inbound calls if the handset loses registration e.g. because the internet connection is down or due to a power cut.
4. Next to the applicable option(s) enter your destination telephone number applicable to that Call Forward type. Please ensure this is a normal number that would function normally if dialled by a user!
5. Select Enabled next to the applicable Call Forward option(s) you wish to activate.
6. Select Save.
TOP TIP - always test configuration changes to ensure they are operating as expected.
Setting a Divert from a Ring Group (by Cust Admin)
It is important to check the call flow and time conditions when looking to add a divert/forward to a Ring Group and follow the call routing through the system. This is key to ensure that when you do apply a divert the incoming calls will move through the system as expected and divert from the Ring group to the mobile number.
There are two ways to set up the divert/forward from the ‘Ring Group’:
METHOD 1
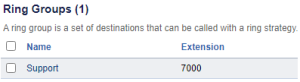
Navigate to ‘Configuration’ and select ‘Ring Groups’
1. Select the ‘Ring Group’. i.e. 7000 for ‘Support’
2. Scroll down to the ‘Ring Group Forward’ field. From ‘Ring Group Forward’ select ‘Enabled’ and add the desired mobile number. Setting the call forward here will mean that calls do not ring on the extensions as per ring strategy but rather gets directly diverted to mobile.
3. To disable divert/forward, change the ‘Ring Group Forward’ to ‘Disabled’.
METHOD 2
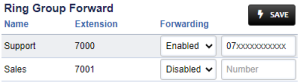
Navigate to ‘Dashboard’ scroll down to ‘Ring Group Forward’
1. Find your desired ring group and set the ‘Forwarding’ to ‘Enabled’ then add the destination number. e.g. mobile number.
2. Click on Save
Time Condition Amendments (by Cust Admin)
What are Time Conditions?
Time Conditions are used to automate call routing based on the time and date configured. The PBX will check the date and time specified and if true will route calls a certain way, alternatively if false will route calls another way. This process does not require user intervention.
How to Amend Time Conditions
Within the FireSwitch Portal, navigate to the ‘Configuration’ tab and select ‘Time Conditions’. From there you can select the Time Condition to change.
Please note that prior to changing any time conditions you must check how it has been incorporated into the call routing by following the call through the system starting from inbound rules.
Configuring Auto Attendant Options & Greetings (by Cust Admin)
To change the Auto Attendant options make sure the greeting reflects the options you will be setting otherwise the callers will be dialling in the wrong options and consequently routing to the wrong destination.
Add a Greeting to the System
A greeting can be added to the system in one of the following three ways.
1. Dialling *732 from a registered extension (via handset or app) and creating a recording.
2. Uploading the file within the FireSwitch Portal by navigating to ‘Apps’ > ‘Media files’ and pressing ‘+’ then ’Upload’ - then selecting a supported audio file.
NOTE: Uploaded files will need to be 16bit 8kHz/16kHz mono WAV format. Spitfire Support may be able to assist by converting incompatible audio files - but this would be a normal chargeable request and we are unable to provide any guarantees on the final result.
3. Submit your 16bit 8kHz/16kHz mono WAV format file to support@spitfire.co.uk for upload to your system. This would be a normal chargeable request.
IMPORTANT NOTE REGARDING MUSIC ON HOLD (MoH): In the United Kingdom, it is mandatory to obtain a PRS and PPL licence to use copyrighted music on telephony systems. It is the sole responsibility of the Customer to ensure that any MoH used is, and remains, licensed in compliance with copyright law.
Viewing Available Greetings
Existing audio files will be already be visible on the FireSwitch Portal. Once any additional greetings have been added via one of the aforementioned steps, then those files will also be visible on the FireSwitch Portal. Navigate to ‘Apps’ > ‘Media Files’ > ‘Recordings’

Applying Greetings to Auto Attendants
1. Navigate to the Auto Attendant you would like to update via ‘Configuration’ > ‘Auto Attendants’ and click its name to open the configuration. e.g. Main:
![]()
2. Change the ‘Greet Long’ field to the desired recording using the drop down. If you have correctly added the audio file into recordings you will be able to see it here.

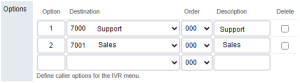
3. Set the ‘Options’ according to the greeting so that when the caller dials ‘1’ or ‘2’ etc will route to the correct destination.
4. Save changes.
5. Test by calling the number that routes to the newly changed Auto attendant.
Differentiating Internal and External Calls via Ringtone
- The phone system can be configured to play one ring tone for internal calls and another for incoming external calls.
- To change the ringtone on the incoming external calls:
- Navigate to the ‘Configuration’ tab and select ‘Inbound Routes’
- Here you can either:
- ‘+Add’ new inbound route.
- Edit existing route by selecting one you have already set up.
- Within the Inbound route settings look for ‘Distinctive Ring’ field.
- Type in the number ‘2’ (this will change the incoming call ringtone).
More Tips Coming Soon!
Watch this space 🙂
|
Softphone Configuration Information - Android
Installing the FireSwitch Softphone (Android)
Android settings: Xiaomi MIUI 14 (Android 12)
Settings > Apps > Manage Apps > FireSwitch
Autostart - Enabled
Battery saver - No restrictions
Other Permissions - all ticked
N.B. device-specific guidance is subject to change.
Android settings: Don't Kill My App!
The third party website Don't Kill My App! provides some general advice covering a number of Android handsets on how to optimise configuration to mitigate against overly aggressive battery optimisation, which in turn may help improve the reliability of applications such as softphones. Please note that Spitfire is not responsible for the content of third party internet websites and cannot guarantee the effectiveness of measures detailed therein. Customers are advised to exercise caution in changing system settings and if in any doubt they should talk to their IT Support in the first instance.
Recommended Application Settings
Watch this space 🙂
Android settings: Samsung (Android 12)
Settings > Apps > FireSwitch
Notifications - Allowed; allow sound and vibration.
Appear on top - Allowed.
Battery - Unrestricted.
N.B. device-specific guidance is subject to change.
More Tips Coming Soon!
Watch this space 🙂
|